Thank you for dropping by. I hope you like my blog!
  Have a nice day!


 [GRAPHICS] Coffee Icon Pack
Monday, December 1, 2014 | 3:28 AM |  0 comments
Hello! I'm back~ The exam week was ended few days ago and yap I finally continued blogging. I changed my look because I got bored with the old one. It spent days for me to play with the codes to get the look I want. This look is actually inspired by Leen. After a long tiring hours of research, I could finally make it to the look I want, yay!
Here, I brought you some coffee-themed icons for you. It's free to use and hope you credit me for using these icons ^.^
Title: Coffee [18 icons + 3 gifs]
Category: Food & Beverages
Tools: Photoshop CS6
References: weheartit
Size: 100x100px
GIF :


Labels: Freebies, Graphics/GIFs, Mine, Photoshop, Web Designing
New Look!Friday, August 1, 2014 | 10:51 AM | 2 comments


 home
homeAccompanied by a cup of coffee in the late night, alone, here I'm feeling satisfied with my new look! Just some little changes ::
New sidebar
 ALOHA (Giving short welcome messages) and new online visitor counter from FC2. First time trying FC2 counters~ it has large choices of designs!
 ABOUT
Now I put my selfie icon there kkkk.. New visitor counters as well. I also put 'Rate My Blog' feature and new Follow button!FONTS
Noticing my sidebar fonts is now different and tinier? Yay! Currently addicted to pixel fonts.. hehe 
BG CHOOSER
Now choose your favorite background for my blog, just click on your favorite one in the ALOHA sidebar.CBOX
I've finally found the perfect location for my Cbox! Brand new look! It's now located on the right side of the blog, just click on the bunny! Tadaaa...it appears! My Cbox has new look too now! Love it? NO MORE
Back to top icon on the right bottom corner, Aimee and the clock. I don't think these are necessary. Why must I put a clock while my visitors can simply see what time it is from their device, lol.MISC
Check out my CLIQUES page! It now has new feature 'RESOURCES' where I put some of my favorite sources for web graphics!
Labels: Adorables, Author's, Backgrounds, Cute, Fonts, Freebies, Graphics/GIFs, hello, Plans, Web Designing
[Tutorial] How To Make a Gif Inside a Text Using Photoshop + Sharpening & ColoringWednesday, July 10, 2013 | 11:37 AM | 4 comments
Hello everyone!
I'm so addicted to making GIFs lately!
 Now I'm gonna give you a step-by-step tutorial of making a GIF inside a text with Photoshop. It's not a new feature but pretty interesting fosho. Enjoy!
1. Open the application Photoshop (I'm using Photoshop CS4) →
Open File → Import → Video Frames to Layers
Choose the video you want to edit. My PS version only supports MP4.

2. Select the length of the video you want to use. You're not gonna put the whole video, right XD

3. Crop your video using Crop Tool.
This isn't necessary anyway, but you MUST do this → Image → Size *set a new size*
The original video's width and length are indeed too big, you have to make it smaller.

4. Make a new layer above all the video layers.

5. Paint the new layer WHITE using Paint Bucket Tool. We are going to make the text here


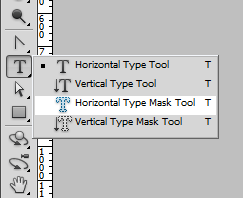
6. Choose Horizontal Type Mask Tool. You might use the Vertical Type Mask Tool if you want to type your text vertically.
7. Type the text on the white layer we've created.

8. Select Move Tool and your text will result to this : *we are selecting the area to earse so you can see the animation behind*

9. Press Del(Delete) and the video frames behind will be shown up.

10. Now we're going to give a colour tone to our gif~! You may skip the colouring steps!
Create a new layer above the video layers, and below the white layer. In this tutorial, I'll use the color pink! I named the layer "Colour". It's result like below :

11. Change the mode of the layer into Color. Keep the opacity 100%.

12. Make another new layer below the white layer. Paint it black.

13. Change the mode into Color Burn *this give stronger colour tone to the gif* . Set the opacity as you like ^^

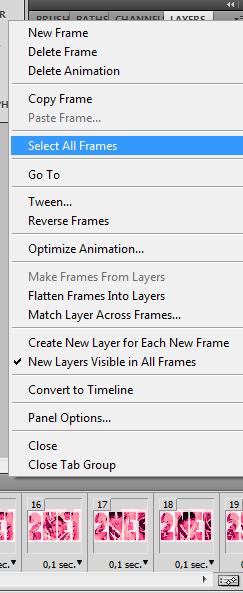
14. Now we are going to sharpen the gif! Follow the next following steps.
Choose Select All Frames.
15. After selwcting all the frames, choose Convert to Timeline or simply click the button on the right bottom corner for shortcut.

16. The result will be like this :

17. Then choose Filter → Convert for Smart Filter

18. The result :

19. Choose Filter → Sharpen → Smart Sharpen or simply press Ctrl+F on your keyboard.

20. Set how sharp you want your gif to be.

21. Now, save our gif. Choose File → Save for Web & Devices

22. Click Save!

Sample results :

Simple, isn't it?! You can improvise the steps number 10-13. Good luck!
Labels: Art, Freebies, Fun, Graphics/GIFs, Hobbies, Photoshop, Tutorial, Web Designing